Support Centre
Find the answers to your questions and get the support you need with the VentraIP help centre.
Browse by Popular

Domain Name
- What is a domain name?Eligibility criteria for registering .AU domain namesPremium domain names explained

Web Hosting
View All
Email Hosting
View All
Google Workspace
- Getting Started with Google WorkspaceGoogle Workspace support resourcesTransferring an existing Google Workspace service to VentraIP

Account
- How do I reset my VIPcontrol password?How do I create a VentraIP account?How can I see who accessed my VentraIP account?

Troubleshooting
- How do I clear my browser cache?Troubleshooting a ‘500 internal server' errorTroubleshooting with a ping test
Setting up Google Workspace MX records
Domain or hosting is with VentraIP
If you have cPanel hosting
- Log in to cPanel.
- Click on Remote MX Wizard under the Email header.
- Select the domain name you want to set MX records for
- Select the G Suite tab
- Under Additional Services, check the boxes of any additional domains you’d like to set up. This is optional and fine to leave as-is.
- Click Continue & Configure the domain with G Suite.
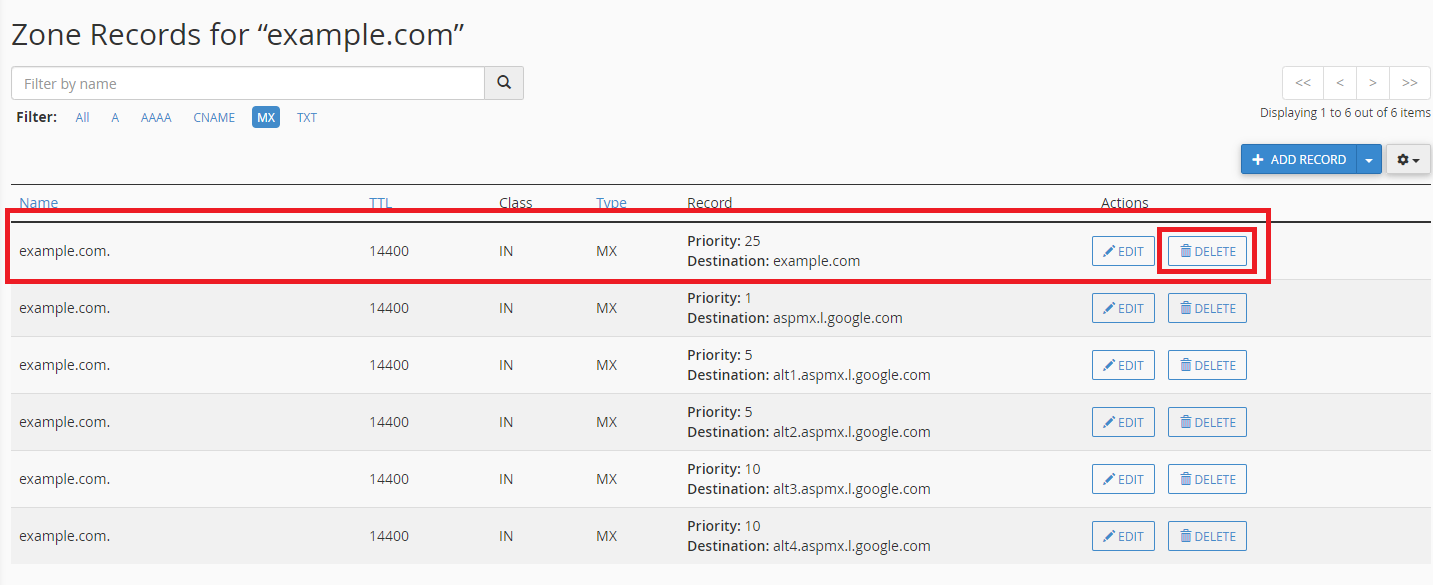
Once you have added the new MX records, you may need to remove the old MX records as it doesn’t get removed automatically sometimes. Here are the steps to do this:
- Log in to cPanel.
- Click on Zone Editor under Domains
- Click Manage next to the domain name you just added the Google Workspace MX records for
- Click Remove next to the MX record with the Destination set to your-domain-here.com OR mail.your-domain-here.com

If you don’t have cPanel hosting
- Log in to VIPcontrol, then navigate to My Services → Domain Management.
- Click DNS next to your domain name in question.
- On this page, click the tab titled DNS Hosting (if this tab does not already have a blue tick on it).
- Click Enable next to DNS Hosting.
- Note that this WILL change your current DNS settings. If you have used the DNS settings to connect to another service, such as hosting, we recommend entering these MX records on your hosting service (see If you have cPanel hosting above). You are safe to disregard this warning if you have not previously connected your domain to any other service.
- Confirm by clicking Set DNS.
- After this page has refreshed, click Add App Preset in the middle of this page.
- Choose Google Workspace from the following list, then confirm by clicking Apply DNS Preset.
 Domain or hosting is with another provider
If your DNS is hosted outside of the VentraIP ecosystem, please reach out to your domain and/or hosting provider (whichever is applicable) for assistance adding these records to your DNS zone.
| Host | Record Type | Priority | Value/Address | TTL |
|---|---|---|---|---|
| @ or leave blank | MX | 1 | ASPMX.L.GOOGLE.COM | 3600 |
| @ or leave blank | MX | 5 | ALT1.ASPMX.L.GOOGLE.COM | 3600 |
| @ or leave blank | MX | 5 | ALT2.ASPMX.L.GOOGLE.COM | 3600 |
| @ or leave blank | MX | 10 | ALT3.ASPMX.L.GOOGLE.COM | 3600 |
| @ or leave blank | MX | 10 | ALT4.ASPMX.L.GOOGLE.COM | 3600 |
| @ or leave blank | TXT | v=spf1 include:_spf.google.com ~all | 3600 |
VentraIP’s policies prohibit our staff from logging into your customer account with another provider.
Generating DKIM keys for Google Workspace (optional)
First, you need to generate a new DKIM record. Here are the steps:
- Log in to the Google Workspace Admin Portal.
- Click on Apps.
- Click on Google Workspace.
- Click on Gmail.
- Click on Authenticate Email.
- Click on Generate New Record.
- Set the DKIM Key Bit Length to 2048.
- Leave the Prefix Selector as “google”. (only change this if you know exactly what this is)
- Click Generate.
- Google will now provide you with a DNS Host Name and TXT Record Value.

We Are Here to Help You
Get in touch with one of our local experts at any time.