Support Centre
Find the answers to your questions and get the support you need with the VentraIP help centre.
Browse by Popular

Domain Name
- What is a domain name?Eligibility criteria for registering .AU domain namesPremium domain names explained

Web Hosting
View All
Email Hosting
View All
Google Workspace
- Getting Started with Google WorkspaceGoogle Workspace support resourcesTransferring an existing Google Workspace service to VentraIP

Account
- How do I reset my VIPcontrol password?How do I create a VentraIP account?How can I see who accessed my VentraIP account?

Troubleshooting
- How do I clear my browser cache?Troubleshooting a ‘500 internal server' errorTroubleshooting with a ping test
Mail app setup for iOS (iPhone + iPad)
Looking to update your mail settings? Find that guide here.
Setting up your account for the first time
- Open the Settings app and go to Mail.
- Then, go to Accounts and click Add account.
- Click Other on the Add Account page.
- Select Add Mail Account under the Mail heading.
- Enter the following:
- Name: the name you wish to send from.
- Email: your full email address.
- Password: the password for this account.
- Click Next to proceed.
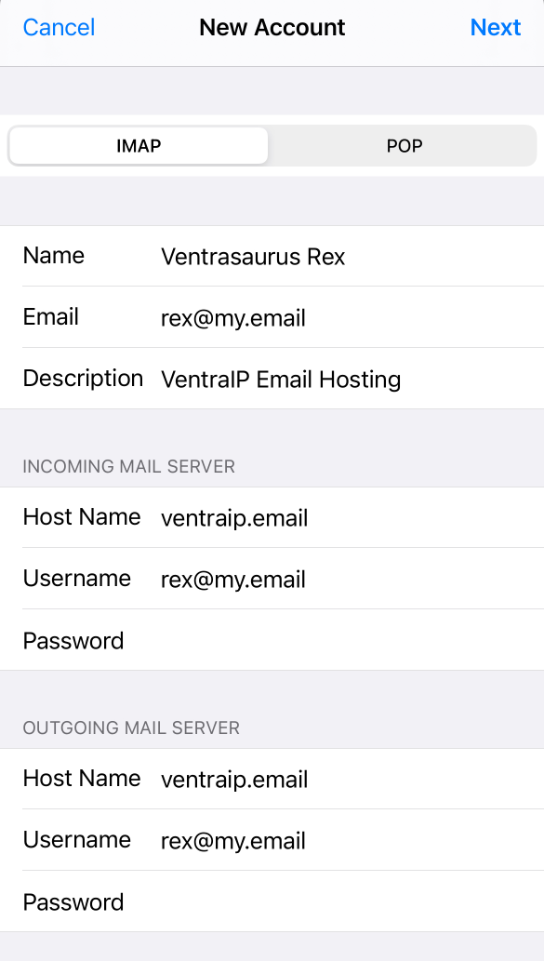
- Enter in the incoming and outgoing server details as follows.
Note: The ‘optional’ Outgoing Mail Server details are mandatory for your VentraIP services!
- Incoming Host Name: locate your email server here.
- Username: your full email address needs to go here.
- Password: the password for your email account
- Outgoing Host Name: this should be identical to the Incoming Host Name.
- Username: your full email address again, as above.
- Password: your password again, as above.
- Here’s a screenshot of what this page could look like (using the VentraIP dedicated email server).

While you should now be able to send and receive emails, you may also need to ensure your mail account is using an SSL connection.
Once the account has been added successfully, follow the steps in this guide to enable SSL on your incoming and outgoing mail servers.
Voila! You should now be ready to go! Head to the Mail App on your iDevice and start sending/receiving!
Still having issues getting set up?
Our support on issues using this software is limited – however, we want to help where we can! Please submit an eTicket and attach some screenshots of your settings for our team to review. Beyond this, please consult the internet or look into the vendor’s knowledge base.

We Are Here to Help You
Get in touch with one of our local experts at any time.

